First we create a mold for the face.

 use gypsona plaster bandages to cover the face work the gypsona so that the first layer goes on as smooth as possible. let dry and put on second layer
 Remove plaster bandage mold from face. and paint layer of rubber latex into the mold.


 the head was attached using a shorter piece of rope knots and eye hooks


using plasticine and a styrofoam head with the eyes cut out sculpt the face (and ears) you would like the puppet to have (the secret to ears. think question marks ?)

cover the plasticine with LOTS OF VASELINE!!
 use gypsona plaster bandages to cover the face work the gypsona so that the first layer goes on as smooth as possible. let dry and put on second layer
 Remove plaster bandage mold from face. and paint layer of rubber latex into the mold.
Paint in another layer of rubber latex, then on the next layer of rubber latex use cheesecloth to strengthen the face. Let dry fully and remove carefully from mold and attach the face back on to the styrofoam head with rubber latex and use the rubber latex with acrylics to paint. attach hair with rubber latex and paint with acrylic.

paper mache a balloon to create the body. at least 3 layers
for the body create a pattern for the legs and hips and shoulder


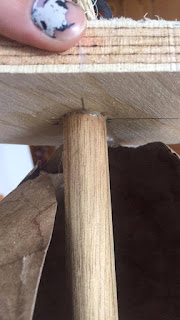
Use the forstner to create an indent to secure dowel using screws and glue

then using a wire coat hanger to create hinges put together hip to thigh, thigh to calf, calf to foot.


then using foam and contact cement I filled out the legs and carved them down.
the arms using rope and staples


the hands were made using a wire and air dry clay painted with rubber latex and acrylic paint
a handle was attached to the head using gorilla glue (remember to wet the wood)
 the head was attached using a shorter piece of rope knots and eye hooks

dress him up cutting out the back of the shirt so that the puppet can be manipulated. and voila


I think I liked him better without the beard...
 |
| and now he sits on my shelf creeping out people in my living room |


